Tuesday, December 31, 2013

Configuring Hyper-V Virtual Machine Settings and Loading an Operating System from an ISO File

In my last blog post, I showed you how to create a basic virtual machine (VM) within Hyper-V.  In this post, I will show you how to go one step further, and  load an operating system (OS) from an ISO file.


1.  Within Hyper-V Manager, click the VM you want to configure, and click Settings from the right-side menu.


2.  Within the VM settings, there are two sections:  Hardware & Management.  The Hardware section allows you add/remove additional memory, processors, drives, etc.  You can also change the boot order here.  To load an OS using an ISO, begin by clicking the DVD drive under the Hardware menu.
 
3. Under Media, click the radio button for Image File, and click Browse.

4. Navigate to an ISO file you already have downloaded or copied, and click Open.  Click OK at the bottom.  The VM will now try to boot to this ISO during the next boot up.

5. Select the VM under the Virtual Machines list, and click Start from the right-side menu.

6. The VM should now boot to the ISO file.  Proceed through the OS installation like you normally would.  After the OS Install is done, you should have an operating VM!

Monday, December 30, 2013

Can you use a Polarized Lens with a VIN Camera?


We have a couple dealerships using a VIN Camera.  Got a call from Cody asking about a Polarized Filter.  Vin uses a Ricoh G700SE camera.  On Ricoh's website, there is a PDF document that references that filter use is possible and to use 37 mm diameter filter.

With the use of the polarized lens will help provide color and contrast enhancement.  Reflected light often shows up as a whitish glare that washes out color in an image.  The circular polarizer corrects this problem producing deeper, dramatically colors.  It removes glare from non-metallic surfaces, such as windows and water color saturation in general, especially outdoors.

Ricoh camera information - http://www.ricoh.com/r_dc/support/brochure/pdf/g700se.pdf

VIN Camera information - http://www.vinsolutions.com/vincamera.aspx

Friday, December 27, 2013

Windows Startup Options.

After you start installing a lot of programs you may notice your computer slowing down when it starts. Most programs add a startup entry when installed so that program will start right when Windows loads. If you don't use a certain program often it is a waste of resources. To disable these programs, do these steps:

1. Go to the "Start" menu and type "msconfig" and then select the top option or hit the "enter" key.


2. This is the window that will come up. Select the "startup" tab.


3. You will then see a list of startup items. Go ahead and uncheck all of the programs you do not want to have startup when Windows does. After you unchecked all the programs you want to disable, press apply then restart your computer. If you want to re-enable the programs later, just check the boxes.


Monday, December 9, 2013

Unable to Open Outlook 2003 Error: "MAPI32.DLL is corrupt or the wrong version"

Received a phone call this morning where the user received the following error message trying to open Outlook 2003.

Error:  Cannot start Microsoft Office Outlook.  MAPI32.DLL is corrupt or the wrong version.  This could have been caused by installing other messaging software.  Please reinstall Outlook.

Fix for this issue.

  1. Find the file MSMapi32.dll.
  2. Which should be located in - C:\Program Files\Common Files\System\Msmapi\1033\.
  3. Rename the file to MSMapi32.old
  4. Click on the Outlook icon and the program should repair itself and replace the file with the correct version.

Monday, November 25, 2013

Creating a Basic Virtual Machine in with Windows 8 Hyper-V

One of the neat features of Windows 8 Pro is the included client Hyper-V software.  While it may be a tad limited compared to the server Hyper-V(details can be found here), it can still be used as a great tool for creating virtual machines (VM) for testing, developing, etc.  Today, I will show you how to create a basic VM in Hyper-V.

Note:  You must have virtualization enabled in the BIOS, and have the Hyper-V feature enabled in Programs and Features.

First, open up Hyper-V Manager.  You can find it easily by doing a search for Hyper-V in the Start screen.


With Hyper-V open, click New, then Virtual Machine under the Actions menu.


On the Before You Begin screen, click Next.


On the Specify Name and Location screen, enter in a name for the VM in the Name box, and select a location to store the VM in.  You can leave it to the default location (can be configured in the Hyper-V Server Settings), or you can override the default location by placing a check in the "Store the virtual machine in a different location" checkbox, and entering in a new path.  For my example, I chose "C:\Virtual".  Click Next.


 Next, choose what generation you would like your VM to be.  Note that most OS's pre-Windows8/Server 2012 are not supported as a Generation 2 VM.  I selected Generation 1 for this example.  Click Next.
Note:  There are no supported ways of changing the generation of a VM.


On the Assign Memory screen, type in the amount of memory you would like to assign to this machine.  You can also choose "Dynamic Memory" (memory adjusts as needed) as well, but I left that unchecked for this VM.  I chose 1024MB (or 1GB).  Click Next.


On the Configure Networking, select any pre-configured connection, or leave it as none.  I already had an "external" connection configured, so I selected that one.  Click Next.


On the Connect Virtual Hard Disk screen, you have the option of creating a new virtual disk, selecting an existing virtual disk, or attaching one later.  I chose to create a new virtual disk, and kept the default settings.
Note:  When selecting a new virtual disk, it automatically creates a dynamic VHDX disk.  If you want a fixed disk or a VHD disk, you will want to select "Attach a virtual hard disk later" and create a new disk after the VM setup.


If you chose to create a new virtual disk, the next screen will allow you to install a OS later, or now from a bootable drive (physical disc, .iso, or .vfd), or from a network-based installation server.  I chose to install an OS later.  Click next when you have selected your choice.


The last screen will present you with summary of all the settings for your new VM.  If everything looks correct, click Finish.

If the VM was created successfully, you should see it listed under Virtual Machines.


For my next blog post, I will show you how to customize a few of the virtual machine settings, and install a OS from an ISO.  Stay tuned!

Monday, November 18, 2013

Email Fishing For Information

Recently we received a fake email where they are fishing for information.  Highlighted below you can see that the antivirus system removed the infected attachment and email address has nothing to do with ADP.   Companies like ADP understand cybercrime and have setup a security alert website with current alerts on the email like the one below.

http://www.adp.com/about-us/trust-center/security-alerts.aspx

On the ADP website, they explain how to report an incident.  Most people should know NOT to OPEN ATTACHMENT or CLICK ON THE LINKS.  After forwarding the email to the correct people(in this case abuse@adp.com) DELETE it.

If you uncertain about an email, search google.com for the sender / subject of the email.  If it is a bad / fake email you will see the search results keywords like security alert, malware, fake email etc.  Again DO NOT CLICK ON ATTACHMENTS or LINKS. Notify your IT staff and DELETE IT.


Friday, November 8, 2013

Setup iCloud backup on iOS 7

1. Click on the "Settings" icon and it will bring you to this menu:


2. Click on "iCloud".


3. Click on "Storage & Backup".


4. It will then ask you for you Apple ID (the e-mail address you used to setup your phone.) After you typed the username and password, iCloud backup will be enabled. It will backup automatically every night when plugged into power and connected to WIFI. You can also do a manual backup by selecting "Back Up Now".


Monday, May 20, 2013

Creating an Email Signature in Outlook Web App (OWA) 2010

Last time, I showed you how to create a signature in Microsoft Outlook 2013.  Now, I'm going to show you how to create a signature in Outlook Web App (OWA) 2010.  Now since OWA is a stripped-down version of Outlook, the signature functionality is pretty limited.  You only have the option for one signature, and it will be automatically added to every new message and reply you create.

1.  First thing's first; browse to your company's OWA site, and log in with your credentials.


2.  After you get logged in, click "Options" in the upper-right corner, right below your name.  Click See All Options" from this menu.


3.  You should see a menu on the left side of the window now.  Click "Settings".


4.  With Settings open, you should be greeted with a "E-Mail Signature" editor in the center of the window.  Enter your information in the text box, and style/format your signature to your liking.  Once you are finished, click "Save" in the lower right corner.  Simple as that!

Monday, May 13, 2013

Microsoft Account needed for Windows 8 Apps


I did not want to sign up for a new email address.  Instead, you can link your existing email to Microsoft Account.  Below is a link and screen shot of the Microsoft Account signup page.


https://signup.live.com/signup.aspx

Thursday, May 2, 2013

How to take a screenshot on an iPhone or other apple device.

1. If you want to take a screenshot on your phone, press the power and home button at the same time.
The screen will flash white when you know you have taken the screen shot.


2. If you then go to your photos on your idevice you can see the screenshot that you just took.


Monday, April 29, 2013

Creating an Email Signature in Microsoft Outlook 2013

Looking for an easy way to create one or more email signatures in Outlook 2013?  Well look no further!  I'll show you how in a few simple steps.


 1.  In Outlook 2013, click the File menu on the top bar, and select Options.


2.  In the Options window, click Mail from the left-side menu, and click the Signatures button.


 3.  Click the New button.


4.  Type in a name for your signature.  For this example, we will use "Signature".


5.  In the Edit Signature box, create your signature.  Common email signatures include, but are not limited to first and last name, job position/title, company name, and a phone number.  Below is an example of a email signature:
 

6.  Under the Choose Default Signature section, make sure your email address is selected under Email Account, and make sure your newly created signature is selected under New Messages and Replies/ForwardsClick OK on both screens.


7.  OPTIONAL:  In Outlook 2013, you can create as many email signatures as you want.  Just use Steps 3 - 5 to create any additional signatures you would like.  Want to have a custom signature for new emails, and another custom signature for replies?  No problem!  After you have your signatures created, just specify them under the New Messages and Replies/Forwards boxes.  Simple as that!

Sunday, April 14, 2013

Exchange 2010 OWA - Outlook Web App - Out of Office Reply

Just received a call on how to setup email to let people know that they will be on vacation for the next week.  Exchange 2010 OWA - Outlook Web App made this really easy with ways to customize the time it starts and who get what message.


  1. Enter Domain\User Name, Password, and press the Sign In button.
  2. On the right hand side click on Options, a drop down box should appear.
  3. Click on the Set Automatic Replies.
  4. Put a dot next to Send Automatic replies.
    1. Optional - Send replies only during this time period
      1. Set the Start time.
      2. Set the End time.
  5. Type in your message into Send a reply once to each sender inside my organization with the following message.
    1. Optional - Send automatic reply messages to senders outside my organization.
      1. Set either
        • Send replies only to senders in my Contacts list 
        • Send replies to all external senders.
  6. Type in your message into Send a reply once to each sender outside my organization with the following message.
  7. Make sure to press the Save button at the bottom with done.


Thursday, April 11, 2013

Setting up corporate e-mail on an iPhone


1. Go to Settings then Mail, Contacts, and Calendars.


 2. Select Add Account.


3. Select Microsoft Exchange.


4. Type your email address and password.


 5. When it prompts you, fill out the server, domain, username, and password fields. If your exchange server supports SSL, make sure you turn that on. After all of that hit done and you should be all set.


Monday, April 8, 2013

Adding Work (Corporate,Exchange) Email to Android Smart Phone

Here are some simple instructions on adding your work email to your Android smart phone.   You may need to contact your system administrator for some of these settings.

Note:
These instructions may vary slightly due to manufacturer modifications to the device.


1.  Open your application list, and click Settings.


2.  Scroll down to the Accounts section, and click Add Account.


 3.  Click Corporate.


4.  Enter in your email address and email password.  Click Next.


5.  Enter/Verify the following information, then click Next.
  • Domain\Username:  domain\username
  • Password:  your windows/email password
  • Server:  usually mail.domainname.com
  • Use secure connection (SSL):  check with your system administrator
  • Accept all SSL certificates:  check with your system administrator
  • Port:  check with your system administrator (Usually 25 or 443)
 

6.  On the Remote Security Administration screen, click OK.


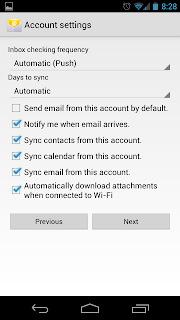
7.  On the Account Settings screen, you can customize these settings to your liking.  Usually the default settings work just fine for the average user.  After you are done customizing, click Next.


8.  Type in a name you would like for this email account (for example, Work).  Click Next.


9.  On the Activate Device Administrator screen, click Activate.


10.  Setup should be finished.  You should be receiving emails within a few minutes.