Monday, April 29, 2013

Creating an Email Signature in Microsoft Outlook 2013

Looking for an easy way to create one or more email signatures in Outlook 2013?  Well look no further!  I'll show you how in a few simple steps.


 1.  In Outlook 2013, click the File menu on the top bar, and select Options.


2.  In the Options window, click Mail from the left-side menu, and click the Signatures button.


 3.  Click the New button.


4.  Type in a name for your signature.  For this example, we will use "Signature".


5.  In the Edit Signature box, create your signature.  Common email signatures include, but are not limited to first and last name, job position/title, company name, and a phone number.  Below is an example of a email signature:
 

6.  Under the Choose Default Signature section, make sure your email address is selected under Email Account, and make sure your newly created signature is selected under New Messages and Replies/ForwardsClick OK on both screens.


7.  OPTIONAL:  In Outlook 2013, you can create as many email signatures as you want.  Just use Steps 3 - 5 to create any additional signatures you would like.  Want to have a custom signature for new emails, and another custom signature for replies?  No problem!  After you have your signatures created, just specify them under the New Messages and Replies/Forwards boxes.  Simple as that!

Sunday, April 14, 2013

Exchange 2010 OWA - Outlook Web App - Out of Office Reply

Just received a call on how to setup email to let people know that they will be on vacation for the next week.  Exchange 2010 OWA - Outlook Web App made this really easy with ways to customize the time it starts and who get what message.


  1. Enter Domain\User Name, Password, and press the Sign In button.
  2. On the right hand side click on Options, a drop down box should appear.
  3. Click on the Set Automatic Replies.
  4. Put a dot next to Send Automatic replies.
    1. Optional - Send replies only during this time period
      1. Set the Start time.
      2. Set the End time.
  5. Type in your message into Send a reply once to each sender inside my organization with the following message.
    1. Optional - Send automatic reply messages to senders outside my organization.
      1. Set either
        • Send replies only to senders in my Contacts list 
        • Send replies to all external senders.
  6. Type in your message into Send a reply once to each sender outside my organization with the following message.
  7. Make sure to press the Save button at the bottom with done.


Thursday, April 11, 2013

Setting up corporate e-mail on an iPhone


1. Go to Settings then Mail, Contacts, and Calendars.


 2. Select Add Account.


3. Select Microsoft Exchange.


4. Type your email address and password.


 5. When it prompts you, fill out the server, domain, username, and password fields. If your exchange server supports SSL, make sure you turn that on. After all of that hit done and you should be all set.


Monday, April 8, 2013

Adding Work (Corporate,Exchange) Email to Android Smart Phone

Here are some simple instructions on adding your work email to your Android smart phone.   You may need to contact your system administrator for some of these settings.

Note:
These instructions may vary slightly due to manufacturer modifications to the device.


1.  Open your application list, and click Settings.


2.  Scroll down to the Accounts section, and click Add Account.


 3.  Click Corporate.


4.  Enter in your email address and email password.  Click Next.


5.  Enter/Verify the following information, then click Next.
  • Domain\Username:  domain\username
  • Password:  your windows/email password
  • Server:  usually mail.domainname.com
  • Use secure connection (SSL):  check with your system administrator
  • Accept all SSL certificates:  check with your system administrator
  • Port:  check with your system administrator (Usually 25 or 443)
 

6.  On the Remote Security Administration screen, click OK.


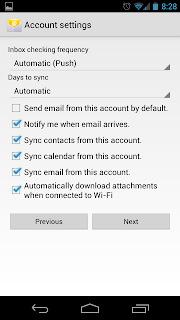
7.  On the Account Settings screen, you can customize these settings to your liking.  Usually the default settings work just fine for the average user.  After you are done customizing, click Next.


8.  Type in a name you would like for this email account (for example, Work).  Click Next.


9.  On the Activate Device Administrator screen, click Activate.


10.  Setup should be finished.  You should be receiving emails within a few minutes.